August 19, 2016

New PTU Kit - Tropical Getaway

Go on a trip with Tropical Getaway! Everything you need to escape reality and enjoy a little paradise is inside my new kit. It comes with 154 elements and 21 awesome papers! 


Purchase it at the Pimpin PSPers Warehouse today!
Thanks for your support!
♥♥♥

July 27, 2016

New PTU Kit - Bad Boys

Bad Boys is full of all the stuff a bad boy could ever need. It's perfect for that guy tube you've been wanting to play with for a while! It comes with 156 elements and 18 papers.


Purchase it at the Pimpin PSPers Warehouse today!
Thanks for your support!
♥♥♥

May 17, 2016

NEW Cluster Frames from Drea's Designs!

Check out the new cluster frames by Drea's Designs made to match Before The Rainbow and Dark Goddess. 

Exclusively at Pimpin' PSPers Warehouse!


Purchase it at the Pimpin PSPers Warehouse today!
Thank you for your support!
♥♥♥

May 12, 2016

FTU Tutorial - Hot & Nerdy

FTU tutorial using Hot & Nerdy by Gimptastic Scraps!
**This tutorial was written by me and any resemblance is purely coincidental. It is written for those with a working knowledge of Photoshop.**

Scrap Kit
Mask
WSL_363

Template

Elements
Apple
Backpack
Books
Bottle cap
Comp Book
Crayons
Flower 2
Flower 3
Flower 4
iPod
Lightbulb
Lips
Locker
Makeup 1
Makeup 2
Marker
Stapler

Papers
Paper 2
Paper 4
Paper 5
Paper 10

Let's start!
Open a new canvas, size 650x650.
Open the template and move layers 1-6 including the frames. Leave the word art for later.
Place paper 5 over layer 6. 
Place paper 2 over both layers 4 & 5. 
Place paper over layer 3.
Add desired drop shadow as you go.
Leave all frames white and add desired amount of noise (glitter) to each frame layer.
Now take the locker and place it behind layers 4 & 5. Duplicate it twice and make a locker layer. Spread them out, but leave no spaces in between. Use the tag as a guide.
Place your tube in front the the template and resize.
Take a close up of the tube and place it in both layers 1 & 2, alternating the direction the tube faces.
Behind layers 1 & 2, place the lips on the left side.
Place the comp book on top and to the right of the lips.
Starting from the comp book and covering the right side of the tube place the crayons. Duplicate the crayons and place two more layers behind the lips and book then the tube. 
Now place the backpack to the right and behind the tube.
Place the iPod and makeup1 in front of the backpack.
Behind the backpack and to the right place flower 3 then the apple behind it and finally the light bulb.
To the left of the tube and behind her place the books.
In front of the books and still behind the tube place the marker laying down.
Behind the marker place flower flower 2 then to the right of the that flower place flower 4. 
Behind the flowers place the stapler. Aim it so it's pointing up.
Behind the stapler and to the left place makeup 2.
Behind the books and lipstick place flower 3 then to the right of that place the bottle cap.
Now you can place the word art and design it how you like. 
My word art is simply a black overlay with a glossy bevel, white stroke and a purple outer glow with a drop shadow.
Add desired effects to tube and tube closeups. 
I just used blending options included in PS.
Add the mask with paper 10.
Add your tagger mark and copyright information.
Crop off any extra canvas.
Save as a .psd & .png.

Free Snags!
Thanks for coming by!


♥♥♥

May 1, 2016

New PTU Kit - Dark Goddess

Dark Goddess is perfect for that night when you just want to stay home brewing potions and chanting spells! It comes with 117 elements and 15 papers.


Purchase it at the Pimpin PSPers Warehouse today!
Thanks for your support!
♥♥♥

April 21, 2016

New PTU Kit - Spring Day!

Welcome to my Spring Day! With soft purples and pinks and all the green you can see, Spring Day is just what you need!
The kit comes with 116 elements and 16 papers.


Purchase it at the Pimpin PSPers Warehouse today!
Thanks for your support!
♥♥♥

November 27, 2015

Black Friday/Cyber Monday Sale!!


I have all my kits for 50% off! 
Pick up all my my kits for just $1 each!

Participating stores:

Sale through Monday!

Have fun shopping!! 


November 11, 2015

NEW PTU Kit- Ana


The third kit, final for now, in the Carpe Diem series is Ana. She's bright, beautiful, and pink! I matched her with pinks and greens in a summer by the beach theme! I had fun making this and I know you'll have fun creating! 

Check it out in the store:
Click the previews.

Thank you for your support!
♥♥♥♥♥


November 5, 2015

NEW PTU Kit- Roller Girl


My second kit in the Carpe Diem series is Roller Girl! It comes with 40 elements and 10 papers.

Check it out in the store:
Click the previews to go to the store.
Thank you for your support!
♥♥♥♥♥

November 4, 2015

NEW PTU Kit - Dead Babe


I have news! I have joined the lovely ladies at Mystical Scraps! I will be making matching kits for the artists in the store and my first pick was Carpe Diem and I started with Dead Babe. 

My first kit in the Carpe Diem series comes with 68 elements and 16 papers in bright blues and darker than black black! 

Click the preview to go to the store.

Thank you for your support!
♥♥♥♥♥

New PTU Kit - Winter Attitude


Winter Attitude is my newest matching kit for the XeracX Store. It comes with 72 elements and 15 papers. It's full of all things winter with reds, whites, and silvers

You can purchase the kit with or without the tube:
Winter Attitude kit with tube
If you already own the tube, but love the kit, go here! 
 2013 Winter Attitude

**If there are any tubes from the XeracX Store you are dying to see a matching kit for let me know in the comments below and I could pick yours! If I do, you get the kit for free!**

Thanks for your support!
♥♥♥♥♥♥

October 10, 2015

PTU Kit- Halloween Bash


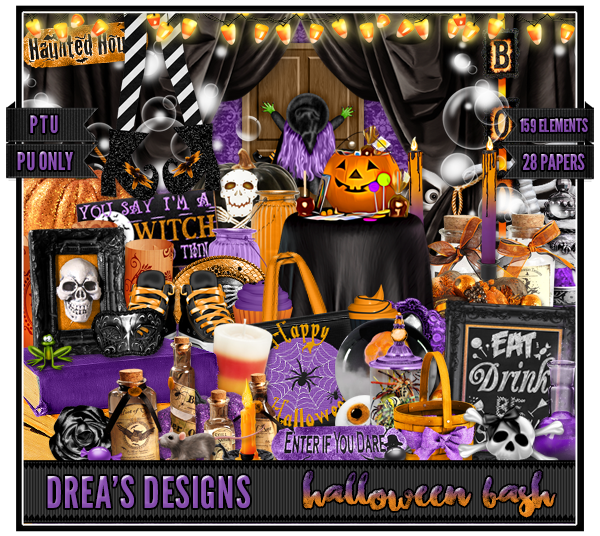
I hope you're ready to party like it's Halloween! My new kit, Halloween Bash, has all the goodies you need to put on the best bash! It comes with 159 elements and 28 papers. 
Purchase it in any of my stores.
Find the links on the right! 

Thanks for your support!
♥♥♥

October 2, 2015

FTU Tutorial - Fear the Night


FTU tutorial using Dead of Night by Gimptastic Scraps!
**This tutorial was written by me and any resemblance is purely coincidental. It is written for those with a working knowledge of Photoshop.**

Scrap Kit

Template

Elements
bat
black rose
candle1
candles
crow
crystal
deco2
doll head
ghost woman
hour glass
key
lightening
medical dish
moon
necklace 
old bottle
rose
skull pie
spell box
spider
tombstone
tree
WA

Papers
3
6
9

Let's start!
Open a new canvas, size 650x650.
Open the canvas, select only layers 2, 5, and 6 and move them onto your blank canvas together.
Place paper 3 over layer 2 and clip to the layer. Resize and move it around as you like. Merge down to combine the paper and template layer together.
Now place paper 6 over layer 5 and clip to the layer. Repeat the same steps for the last layer.
Take paper 9 and place it over layer 6 and clip. Repeat the same steps as before.
Add a gray border to each layer, color gray, and add noise.
Place the moon behind the template in the empty space on the left. Resize and add drop shadow.
On top of the moon and layer 5 place the bat. Resize and add drop shadow.
Place the tree between layers 5 and 6. Resize and add drop shadow.
Place the tombstone on the right side of the template in front of everything. Resize and add drop shadow.
Place the spell box to the left of the tombstone. Resize and add drop shadow.
Behind the box and tombstone place the candles. Resize and add drop shadow.
Behind the tombstone on the right place the hour glass. Resize and add drop shadow.
In front of the tombstone on the right of it place candle 1. Resize and add drop shadow.
Duplicate the candle and place it on the left side of the spell box. 
Behind the candle and spell box place deco2. Resize and add drop shadow.
Place the doll head in front of the candle. Resize and add drop shadow.
Place a small spider on the doll head. Resize and add drop shadow.
Place the black rose to the right of the doll head then the rose next to it. Resize and add drop shadow.
Place the old bottle to the right of the rose. Resize and add drop shadow.
"Hang" the necklace over the old bottle. Resize and add drop shadow.
In front of the rose and the old bottle place the medicine dish. Resize and add drop shadow.
Next to the old bottle place the skull pie. Resize and add drop shadow.
Behind the skull pie place a copy of the rose.
To the right of the pie place the crystal. Resize and add drop shadow.
In front of the crystal place the key so it lays in front of the candle too. Resize and add drop shadow.
Behind the crystal and candle place a copy of the black rose.
On top of everything place the lightening so it's coming from the upper right hand corner and resize.
On top of everything place the ghost woman. She will act as the tube. Resize and add drop shadow.
Use the WA and place that over the tube on the lower right hand side. Now add to the word art with a font of choice so it reads "Fear The Night". 
Use a dark paper/color for the mask of choice.
Add your tagger mark and copyright information.
Crop off any extra canvas.
Save as a .psd & .png.

Free Snags!
Thanks for coming by!
♥♥♥

FTU Tutorial - Halloween Kitten

FTU tutorial using Halloween Kitties by Kittz Kreationz!
**This tutorial was written by me and any resemblance is purely coincidental. It is written for those with a working knowledge of Photoshop.**

Font

Scrap Kit

Tube
Skateboard by Ed Mironiuk
(No longer for sale)

Elements
4
7
12
24
25
26
27
30
33
34
41
43
50
52
53
57
58

Papers
P5

Let's start!
Open a new canvas, size 650x650.
Take ele 24 and duplicate it three times so you can make a frame. Resize as necessary.
Place paper 5 behind the frame, resize, then erase anything outside the frame.
Place the tube in front. Resize and add a drop shadow.
To the right of the tube place ele57. Resize and add a drop shadow.
Behind the cauldron place ele50. Resize and add a drop shadow.
Between the cauldron and headstone place ele34. Resize and add a drop shadow.
In front of the tube on the left place ele41. Resize and add a drop shadow.
In front of the pumpkin place ele43. Resize and add a drop shadow.
Behind the tube place ele7. Resize and add a drop shadow.
Behind the tube and lips place ele58. Resize and add a drop shadow.
Behind the flower place ele30. Resize and add a drop shadow.
On top of the bow place ele4. Resize and add a drop shadow.
Duplicate ele4 and place it on the right side of the tube.
In front of the tube and next to the pumpkin and drink place ele33.
For the wordart select the pixels of it then expand by 2 and fill with black. 
Now select the pixels of the black layer and expand by 2 and fill with the blue pulled from the paper.
Now add noise to the blue layer then drop shadow.
Place ele25 at the top left hand side of the frame. Resize and add a drop shadow.
Place ele52 on the right side of the frame behind the tube. Resize and add a drop shadow.
Behind the frame and paper place ele53. Resize so just the tree limbs are sticking out, but you can still make out that it's a tree. Resize and add a drop shadow.
Place ele26 behind the frame in the upper left hand corner. Resize and add a drop shadow.
Duplicate ele26 and place it in the corner of the lower left hand of
the frame. 
Place ele27 behind the spider webs on the left side of the frame. Rotate it so it's vertical.
Duplicate and place it on the right side of the frame as well.
Place ele12 on top of the tube but erase some so it's not overpowering.
For the mask, use the blue color from the paper again. 
Add your tagger mark and copyright information.
Crop off any extra canvas.
Save as a .psd & .png.

Free Snags!

Thanks for coming by!
♥♥♥

FTU Tutorial - Witch Bash


FTU tutorial using Monster's Bash by Melissaz Creationz!
**This tutorial was written by me and any resemblance is purely coincidental. It is written for those with a working knowledge of Photoshop.**

Font

Scrap Kit

Tube
*You must obtain a license to use this tube.*

Elements
6
7
8
9
10
11
13
14
15
16
18
19
23
31
39
41
Papers
1
6

Let's start!
Open a new canvas, size 650x650.
First we need to make the frame. Take element 6 and make a square by duplicating the string three times. You may have to overlap them a little to make it look right. Once you have it finished, merge the layers together.
Place the tube in front of the frame and resize. Add a drop shadow.
Place the frame behind the tube and make sure both are resized so there is enough room around them to make the tag.
Place paper 6 behind the frame, resize, and add a drop shadow.
Erase anything hanging outside the frame. 
Now place ele10 in front of the frame, behind the tube, and to the left of her.  Resize and add a drop shadow.
Place ele39 to the right and behind the cauldron. Resize and add a drop shadow.
In front of the cauldron place ele18 and 31. Resize and add a drop shadow.
To the right of the frog place ele14 and flip horizontally. Resize and add a drop shadow.
In front of the pumpkin and next to the drink place ele23. Resize and add a drop shadow.
On the right side of the frame place ele19. Resize and add a drop shadow.
On top of the sign place ele41. Resize and add a drop shadow.
In front of the sign place ele16. Resize and add a drop shadow.
In front of the pumpkin and candy place elements 13,11, 15 in that order from left to right. Resize and add a drop shadow.
The tube will be placed in front of everything so we need to have something covering her a little. Take ele6 and place it over the tube. Erase where necessary (face especially) and make sure some of the tube is covered. 
Behind everything but on top of the frame place ele9. Resize and add a drop shadow.
Place ele7 sparingly behind the frame. Resize and duplicate as needed to achieve a similar look. 
Use paper 1 with your mask of choice.
Add your tagger mark and copyright information.
Crop off any extra canvas.
Save as a .psd & .png.

Free Snags!
Thanks for coming by!
♥♥♥

September 15, 2015

New PTU Kit - Spider Queen


Spider Queen is my newest matching kit for the XeracX Store! It comes with 78 elements and 18 papers. It perfectly matches the black and green layers of the tube!

You can purchase the kit with or without the tube:
Thank you! 
♥♥♥

August 23, 2015

New PTU Kit - Katy's Cone


Check out my new matching kit for Katy's Cone in stores now! It comes with 60 elements and 18 papers. It's the perfect match to Rac's adorable tube!

You can purchase the kit with or without the tube:


Thank you! 
♥♥♥


August 12, 2015

50% off Sale!


I am Designer of the Month at Heartbeatz Creationz!
This works out perfectly for you because you can 
grab kits for just a $1. That’s 50% off!

Purchase here and get a free kit for spending $5!
http://tinyurl.com/pz49w9x

Just a few of my kits!


July 9, 2015

NEW PTU Kit - Material Girl


It feels like forever since I posted a new kit. I hope you like what I have coming up for you! ♥

 The first new kit is Material Girl! It comes with all the girly stuff you could ever ask for! It has the bling, the make up, the fashion, design, and more! It comes with 157 elements and 24 papers.
Purchase it at the following stores:

Thank you for your continued support!! ♥♥♥

May 9, 2015

PTU Kit - Pool Party


It's time for a Pool Party!
This kit comes with 108 elements and 17 papers.

Purchase it at the following stores:

Thank you for your continued support!! ♥♥♥

Welcome to my new blog! I will post all future kits and CT work from Drea's Designs on this blog. You can still visit my old blog for everything Drea's Creations!